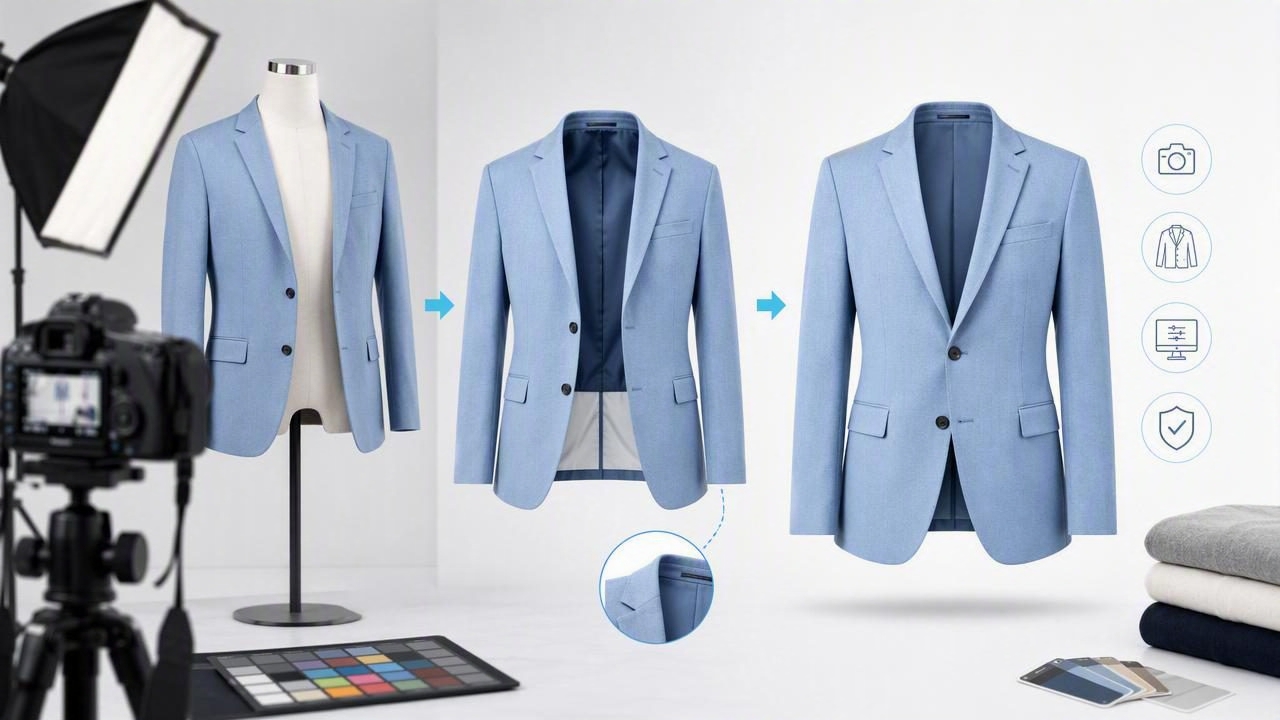
Ghost mannequin product photos give clothing a structured, wearable appearance without showing a model or the mannequin itself. Also called an invisible mannequin effect, this presentation style helps shoppers see the garment’s shape, neckline, sleeves, drape, and interior details more clearly than a flat photo often can.
For fashion resellers, boutiques, and e-commerce brands, the goal is not to make an item look different from reality. The goal is to create a clean, consistent image that makes it easier for buyers to understand what they are purchasing. A well-made ghost mannequin image can be especially useful for dresses, blazers, shirts, sweaters, jackets, and structured tops.
This guide explains how to create ghost mannequin product photos from start to finish, including what to photograph, how to plan the inner-garment shot, and how to review the final result honestly.
What Is a Ghost Mannequin Product Photo?
A ghost mannequin photo is created by photographing a garment on a mannequin and then removing the visible mannequin during editing. Usually, the editor combines a main front or back photo with a second image showing the inside of the neckline, collar, waistband, cuff, or armhole.
The finished image creates the impression that the garment is being worn by an invisible person. This effect provides more dimension than a folded or flatlay image while keeping attention on the product itself.
Ghost mannequin photography is most effective when the item has a defined shape. For example, a structured blazer can show its shoulder line and lapels, while a dress can display its waist placement and skirt volume. Very loose, sheer, heavily textured, or highly reflective pieces may need extra care because their edges and fabric details can be harder to represent cleanly.
Why Ghost Mannequin Images Help Apparel Listings
Shoppers cannot touch a garment online, so images need to answer practical questions quickly. Does the shirt have a fitted or relaxed silhouette? Where does the collar sit? Is the cardigan cropped? Does the jacket have shoulder padding? A ghost mannequin image can make those features easier to inspect.
- Clearer silhouette: The garment keeps its intended shape without a visible person distracting from it.
- More consistent catalog images: Similar products can be photographed from the same angle and cropped to a similar frame.
- Better structural detail: Collars, necklines, armholes, and waistbands are easier to understand than in many flatlay photos.
- Flexible marketplace use: A clean apparel image can work as a primary listing photo or as part of a multi-image set.
That said, a ghost mannequin image should not be the only photo in a listing. Include detail images of labels, fabric texture, care tags, hardware, measurements, flaws, and any areas buyers may want to inspect. A polished main image supports the listing; it does not replace accurate documentation.
The Essential Photos You Need Before Editing
The invisible mannequin effect depends on having the right source images. Trying to reconstruct a collar or interior area that was never photographed can create an unnatural result. Before you start, take at least two photographs for each view you want to create.
| Photo | What It Shows | Why It Matters |
|---|---|---|
| Main garment photo | Front or back of the item on a mannequin | Provides the overall shape, fit, and outer details. |
| Inner detail photo | Inside neckline, collar, waistband, or armhole | Fills the empty area left when the mannequin is removed. |
| Detail photo | Buttons, print, fabric, zipper, or label | Supports an accurate listing beyond the primary image. |
For a crewneck sweater, the second image should show the inside back neck and shoulder area. For a blazer, photograph the collar and inner lapel area. For a skirt or trousers, capture the inside waistband if that section will be visible in the final image.
Keep the camera angle consistent between the main image and the inner detail image. If the main shot is taken straight on but the interior shot is photographed from a steep angle, the pieces may not align naturally during editing.
Step 1: Prepare the Garment Without Changing Its Reality
Start with the actual condition of the item. Button the appropriate buttons, close zippers, straighten hems, and arrange sleeves evenly. Use clips or pins only where necessary to reduce excess bulk, and keep them out of the final frame.
Light wrinkle reduction can improve readability, especially around collars, plackets, and hems. However, do not edit away signs of wear, damaged seams, pilling, stains, or fabric distortion that a buyer should know about. Product photography should present clothing attractively while remaining faithful to the garment being sold.
Check these areas before photographing:
- Collar points and neckline symmetry
- Shoulder seams sitting evenly on the mannequin
- Sleeves hanging at similar lengths
- Buttons, zippers, pockets, and belt loops aligned correctly
- Hems lying naturally rather than pulled too tightly
A garment does not need to look perfectly pressed to be sellable. The aim is to remove distracting presentation issues, not to imply a different fabric quality or condition.
Step 2: Set Up a Consistent Shooting Area
Use a plain, uncluttered background and soft, even light. Window light can work if it is indirect and consistent, while simple soft lighting can reduce harsh shadows. Avoid mixing warm indoor lighting with cool daylight, as inconsistent color can make the garment difficult to evaluate.
Position the camera at approximately chest height for tops and at the garment’s center for longer pieces. Keep it level and parallel to the product. Tilting the camera up or down can distort proportions, making a hem, sleeve, or shoulder look wider than it is.
Leave enough room around the garment for cropping, but do not place it so far away that important details become soft. For catalog consistency, mark the floor position for the mannequin and camera tripod once you find an angle that works.
Step 3: Photograph the Main View and the Interior View
Take the front image first. Make sure the garment is centered, fully visible, and not cut off at the shoulders, cuffs, or hem. Then photograph the inner area needed for the ghost effect.
Here is a concrete example: imagine you are photographing a navy women’s blazer. Capture the blazer from the front on a torso mannequin, with both lapels flat and the top button open. Next, carefully turn the blazer or position it so you can photograph the interior neckline and inner back panel. In the finished image, that interior piece can fill the neck opening after the mannequin is removed.
For this blazer, do not pull the collar excessively wide just to create a larger opening. That can make the final image suggest a shape the garment does not naturally hold. Instead, photograph the inside at a realistic angle and use the main image to preserve the garment’s true outer silhouette.
Step 4: Build the Ghost Mannequin Effect Carefully
Editing generally involves removing the background and mannequin from the main image, then placing the interior detail image behind or inside the neck opening. The most important part is alignment. The collar edge, shoulder seams, and interior fabric should meet in a way that looks plausible at normal viewing size.
- Choose the sharpest, most evenly lit main image.
- Remove the visible background and mannequin while preserving garment edges.
- Add the interior neckline, collar, or waistband photo behind the opening.
- Adjust scale and placement so seams and edges align naturally.
- Review the garment at full size and at marketplace thumbnail size.
Do not over-smooth fabric during this process. Natural knit texture, stitching, quilting, ribbing, and minor folds often help buyers understand the material. If an edit removes a genuine seam, changes a print, creates an odd edge, or makes one sleeve look different from the other, return to the original photos and correct it.
Common Ghost Mannequin Mistakes to Avoid
Missing interior details
A blank neck opening is one of the quickest ways to make a ghost mannequin image look unfinished. Capture the inside section during the shoot rather than trying to invent it later.
Uneven edges around collars and sleeves
Fine edges are difficult in any background removal workflow. Zoom in and inspect collar points, armholes, lace, fringe, and sheer fabric. If the edge no longer resembles the original garment, use a less aggressive edit or reshoot with clearer contrast.
Unrealistic shaping
A ghost mannequin photo can show structure, but it cannot reliably demonstrate exact fit on every body type. Avoid narrowing a waist, enlarging shoulders, lengthening a hem, or reshaping sleeves to create a more dramatic silhouette.
Using one image for every listing
Different garments need different presentations. A structured jacket may suit a ghost mannequin image, while a soft scarf, folded graphic tee, or delicate knit may be clearer in a flatlay or hanger photo. Choose the format that best explains the actual item.
A Simple Quality-Control Checklist
Before publishing, compare the finished image side by side with the original garment photo. Ask whether the edited version still communicates the same item.
- Does the color look reasonably consistent with the original?
- Are the neckline, sleeves, hem, and seams intact?
- Does the garment retain its actual shape and proportions?
- Are visible condition issues documented elsewhere in the listing?
- Would a buyer understand that styling, fit, and drape can vary by person?
Helpful standard: A strong product photo makes the garment easier to inspect. It should not create certainty about hidden construction, exact texture, or fit that the original item cannot support.
Use Ghost Mannequin Photos as Part of a Complete Listing
Your ghost mannequin image may work best as the first or second photo, followed by close-ups and condition documentation. Pair it with a concise title, accurate brand and size information, fabric details when available, and measurements for high-consideration items.
For sellers who want a mobile workflow, Clothing Studio’s guide to ghost mannequin photos explains how this clothing presentation style can be created with an AI-powered editing app. Review every output against the original garment, especially around detailed edges and interior areas; full app features require a subscription.
When photographed thoughtfully and edited with restraint, ghost mannequin product photos can make apparel listings look more organized, professional, and easier to shop—while keeping the garment itself at the center of the image.
