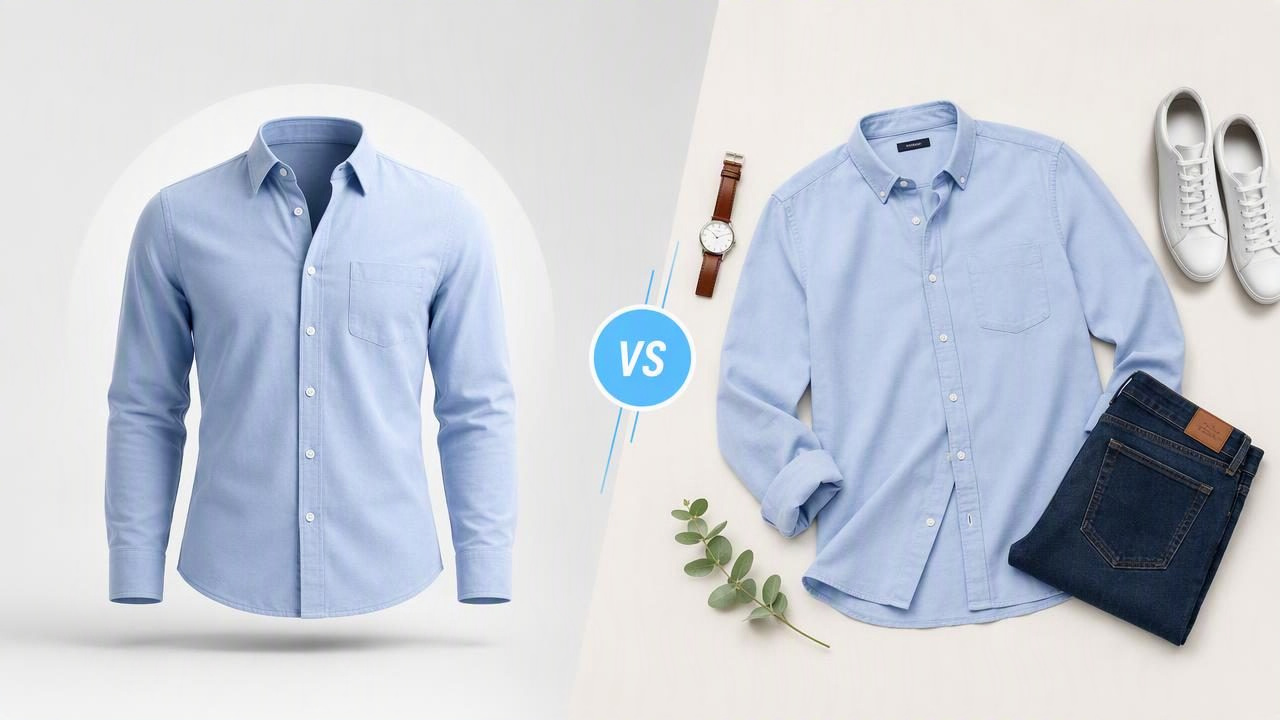
For fashion resellers and online apparel brands, product photography has one important job: help shoppers understand what they are buying. A buyer cannot touch the fabric, inspect the cut, or try on the garment, so the listing photos need to communicate shape, details, condition, and styling as clearly as possible.
Two popular approaches are the ghost mannequin image and the flat lay. Both can create attractive clothing listings, but they solve different presentation challenges. A ghost mannequin image emphasizes a garment’s structure and silhouette, while a flat lay makes it easy to show the item’s overall design, fabric pattern, and included pieces.
The best choice is not always about which style looks more professional. It depends on the garment, the sales platform, the information shoppers need, and the original photo quality. This guide compares ghost mannequin and flat lay photography with practical examples, so you can choose the most useful approach for each listing.
What Is a Ghost Mannequin Image?
A ghost mannequin image, sometimes called an invisible mannequin image, presents clothing as though it is being worn by an invisible person. The garment keeps its natural shape through the shoulders, chest, sleeves, waist, and neckline, but the mannequin or model is removed from the final image.
This style is especially useful when a garment’s fit and construction are important. For example, a tailored blazer may look flat and undefined when placed on the floor. On a mannequin, its padded shoulders, lapels, waist shaping, and sleeve length become much easier to see. After the mannequin is removed, the buyer can focus on the blazer itself rather than the display form.
A strong ghost mannequin photo typically shows:
- The garment’s front silhouette and proportions
- Neckline, collar, sleeves, and shoulder structure
- How fabric drapes around the torso
- Visible design features such as pockets, buttons, pleats, or seams
- A clean, consistent background that does not distract from the item
Ghost mannequin photos are common for tops, dresses, jackets, blazers, sweaters, activewear, and structured pieces. They can also work for pants and skirts, although these garments sometimes need additional detail photos to clarify rise, waistband shape, inseam, and leg opening.
What Is a Flat Lay Clothing Photo?
A flat lay shows a garment arranged on a flat surface, usually photographed from directly above. The item may be neatly folded, fully laid out, lightly styled with accessories, or placed alongside other pieces in a bundle.
Flat lays are straightforward to create and often feel natural for resale listings. They are particularly helpful for casual clothing, knitwear, graphic tees, scarves, children’s clothing, accessories, and items that do not need a three-dimensional shape to be understood.
For instance, a vintage graphic T-shirt can look excellent in a flat lay. The overhead angle puts the print front and center, makes color fading visible, and gives shoppers a quick view of the item’s overall condition. A ghost mannequin version might show the shirt’s fit more clearly, but it may not improve the visibility of the graphic itself.
An effective flat lay can highlight:
- Prints, embroidery, logos, and patterns
- Fabric color and visible texture
- Coordinated sets or multiple included items
- Garment length and overall dimensions
- Signs of wear that buyers should be able to review
Ghost Mannequin vs Flat Lay: A Quick Comparison
| Factor | Ghost Mannequin | Flat Lay |
|---|---|---|
| Best for | Structured clothing and fit-focused pieces | Casual items, prints, accessories, and sets |
| Shows garment shape | Strongly | Moderately, depending on arrangement |
| Shows front graphics | Well, but may distort slightly with shape | Very clearly from an overhead angle |
| Setup needs | Usually requires mannequin photos and detail coverage | Requires a clean flat surface and even lighting |
| Useful for consistency | Excellent for a polished apparel catalog | Excellent for quick, cohesive resale listings |
| Potential drawback | Can hide useful context if used without close-ups | Can make fitted or structured items look shapeless |
When a Ghost Mannequin Photo Is the Better Choice
Choose a ghost mannequin presentation when the shape of the garment contributes directly to its value. Buyers often need to see how a piece is constructed before they feel confident enough to purchase it.
1. Tailored and structured clothing
Blazers, coats, formal dresses, button-down shirts, and fitted jackets benefit from a ghost mannequin image because the presentation reveals shape. A blazer photographed flat may conceal its shoulder line and fitted waist. A ghost mannequin image can make these qualities easier to assess at a glance.
2. Clothing with distinctive necklines or sleeves
A cowl neck, puff sleeve, halter top, wrap dress, or off-the-shoulder garment can be difficult to understand in a flat lay. The garment may look twisted or compressed on a surface. A shaped presentation helps shoppers identify how these details are intended to sit.
3. Catalog-style listings
If you are photographing many similar garments for a brand storefront, visual consistency matters. Using the same front-facing ghost mannequin style across a category can make the shop feel organized and easier to browse. It also helps customers compare cuts between products.
4. Items where fit needs context
A fitted ribbed dress is a useful example. In a flat lay, it may appear much narrower than it will when worn. A ghost mannequin image can provide better silhouette context, but it should not replace accurate measurements. Include the garment’s measured chest, waist, length, and any stretch information in the listing description.
When a Flat Lay Is the Better Choice
Flat lay photography is often the practical choice when product details matter more than a body-shaped silhouette. It can be quicker to set up, and it gives sellers more control over exactly what is visible in the frame.
1. Graphic and novelty apparel
For a band tee, sports jersey, holiday sweater, or embroidered sweatshirt, the main selling feature may be the design on the front. A carefully arranged flat lay keeps that artwork readable and avoids shadows or folds crossing the graphic.
2. Folded knitwear and delicate garments
Some items look better folded than stretched onto a form. Cashmere sweaters, lightweight knits, scarves, and soft loungewear can be shown in a tidy folded layout with one close-up of the knit texture, label, and care tag. This can feel both neat and honest.
3. Bundles, sets, and accessories
A flat lay is ideal for showing everything included in one purchase. For example, a two-piece pajama set, three-piece baby outfit, or matching belt and dress can be arranged in a single image that makes the contents immediately clear.
4. Condition-focused resale photos
Resale shoppers want to inspect the actual item. Flat lays can make it easier to document fading, pilling, loose threads, fabric wear, or small marks. Do not rely on a polished main image alone; add close-ups of any relevant flaws so buyers can make an informed decision.
A Practical Example: Photographing a Pre-Owned Linen Blazer
Imagine you are listing a pre-owned beige linen blazer. It has a defined shoulder, a single-button closure, patch pockets, and a small mark near one cuff.
A useful photo sequence could start with a ghost mannequin front image. This gives the buyer an immediate view of the blazer’s silhouette, lapel shape, sleeve structure, and general fit. Next, add a flat lay of the back to show the full length and vent. Then include close-up photos of the label, button, fabric texture, pocket area, and the mark on the cuff.
This is more informative than choosing only one presentation style. The ghost mannequin image communicates structure, while the flat lay and close-ups document the actual condition of the specific garment being sold.
Helpful rule: Use your main image to explain the garment quickly, then use supporting images to answer the questions a careful buyer is likely to have.
How to Make Either Style Look More Professional
Whether you choose a ghost mannequin or flat lay, the quality of the original garment photo still matters. Editing can improve presentation, but it cannot reliably recover every detail lost through harsh shadows, blur, poor lighting, or heavy fabric creasing.
- Prepare the garment first. Remove lint, fasten buttons, straighten hems, and arrange sleeves naturally. Steam or gently smooth the item where appropriate.
- Use even lighting. Soft daylight or balanced indoor lighting helps preserve color and reduces distracting shadows.
- Keep the camera angle consistent. Shoot flat lays from overhead. For mannequin images, keep the camera level and centered with the garment.
- Use a simple background. A neutral, uncluttered setting keeps attention on the clothing and supports a consistent storefront appearance.
- Photograph important details separately. Take close-ups of tags, fabric texture, closures, labels, and flaws before editing the main image.
- Compare the edited image with the original. Confirm that color, seam placement, prints, and visible condition remain accurate enough for the listing.
Important Limitations to Keep in Mind
A ghost mannequin image is a presentation tool, not a perfect fit simulation. It cannot tell a buyer exactly how an item will fit their body, and it should never be used to imply a size, stretch level, or drape that the original garment does not support. Measurements and a clear written description still matter.
Likewise, wrinkle retouching and background cleanup can make a photo easier to view, but they do not repair the physical garment. Do not edit away stains, holes, pilling, discoloration, missing buttons, or other defects that a shopper should know about. The goal is a cleaner presentation, not a misleading one.
Be particularly careful with delicate texture. Fine ribbing, open knits, lace, sequins, sheer panels, and subtle fabric grain may need close-up original photos because edits can change how tiny details appear. Review every final image before publishing.
Choosing the Right Main Image for Your Listing
If the clothing’s silhouette is the main selling point, lead with a ghost mannequin image. If the item’s surface design, condition, or included pieces matter most, lead with a flat lay. For many listings, the strongest approach is to use both: one image for shape and several supporting images for details.
For sellers who want to explore this presentation method, Clothing Studio’s guide to ghost mannequin photos explains how this style can support clearer apparel imagery while keeping the original garment details under review.
