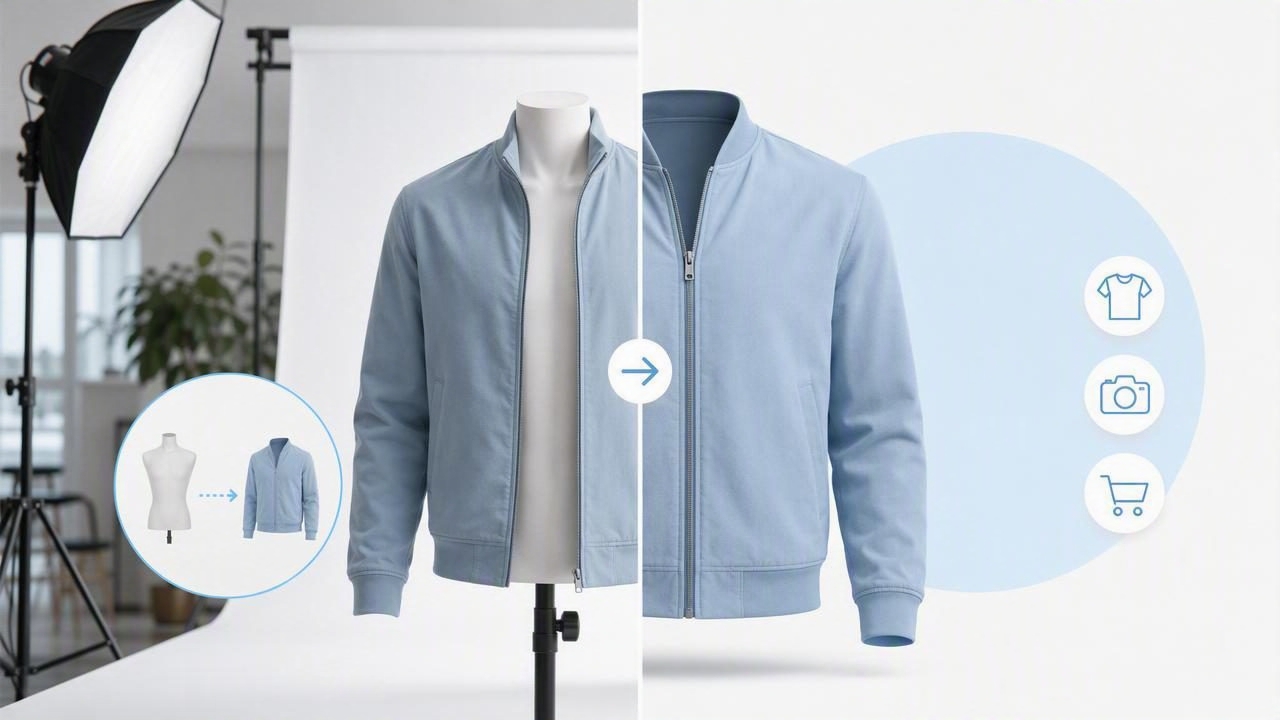
In online fashion, customers cannot touch a fabric, try on a fit, or inspect a garment from every angle. Your product photos need to do much of that work for them. While flat lays, hanger photos, and model images all have a place in e-commerce photography, ghost mannequin photography is one of the most effective ways to show how clothing fits and holds its shape.
A ghost mannequin image gives the impression that a garment is being worn by an invisible person. The clothing appears structured, dimensional, and ready to wear, while the mannequin itself is removed from the final photo. The result is a clean, professional image that keeps attention on the garment rather than the person or prop behind it.
This guide explains when to use ghost mannequin images, which garments benefit most, how they compare with other clothing presentation styles, and how to create a consistent workflow for your listings.
What Is a Ghost Mannequin Image?
A ghost mannequin image, sometimes called an invisible mannequin or hollow-mannequin image, is a product photo where clothing is displayed on a mannequin but the mannequin is edited out afterward. The finished image preserves the natural shape of the garment, including the neckline, shoulders, sleeves, waist, and interior details.
For example, a blazer photographed on a mannequin may show its lapels, fitted shoulders, and tailored silhouette much more clearly than the same blazer laid flat on a table. After editing, the customer sees the blazer as a structured product image without the distraction of a visible mannequin.
The style is particularly popular for apparel brands, resale stores, and marketplace sellers because it creates a catalog-ready look. It also helps standardize listings when you sell clothing in many different sizes and styles.
Why Ghost Mannequin Photography Works for E-Commerce
Good clothing presentation answers key buyer questions quickly: What is the shape? How does the garment sit? Is it fitted, oversized, cropped, draped, or structured? A ghost mannequin photo makes these visual details easier to understand at a glance.
- It adds dimension: Garments look more three-dimensional than they do in many folded or flat-lay photos.
- It focuses on the product: There is no model identity, pose, or background competing for attention.
- It improves consistency: A repeated image format can make a storefront look organized and more trustworthy.
- It highlights construction: Collars, necklines, sleeves, seams, and tailoring are easier to see.
- It works across categories: The approach suits everything from basic tees to premium jackets and dresses.
For fashion reselling, this can be especially useful when you do not have a model available for every item. Instead of relying on inconsistent hanger shots, you can use a presentation style that gives buyers a clearer view of each piece.
When Should You Use a Ghost Mannequin?
Ghost mannequin photography is not necessarily the right choice for every listing. It is best used when the fit, structure, or silhouette is a major selling point. If a shopper needs to understand how a garment is shaped, this style often provides more value than a simple flat lay.
Use It for Structured Garments
Structured garments are among the strongest candidates. Blazers, coats, button-down shirts, tailored trousers, and fitted dresses benefit because they have shape that can be lost when photographed flat. A mannequin supports these pieces and lets the garment look closer to how it would appear when worn.
Use It for Neckline and Interior Detail
Some of the most useful ghost mannequin images include an inset or second photo showing the inside of the neckline, collar, waistband, or back panel. This “hollow” view gives customers a fuller understanding of the item. It can be particularly helpful for clothing with unusual collars, lining, cutout details, or layered construction.
Use It for a Consistent Storefront
If you list many products each week, consistency can save time and strengthen your visual brand. Using the same camera distance, background, crop, and pose for ghost mannequin photos creates a cohesive product catalog. Customers can scan your store more easily when the images follow a familiar pattern.
Use It When a Model Is Not Practical
Model photography can be valuable, but it requires more planning. You may need scheduling, lighting, fitting, styling, and permission to use the final images. Ghost mannequin photography offers a middle ground: more shape than a flat lay and less production effort than a full model shoot.
When Another Clothing Photo Style May Be Better
Ghost mannequin photography is powerful, but it should be part of a broader e-commerce photography strategy. Different products and marketplaces may call for different image types.
| Photo Style | Best For | Main Advantage | Possible Limitation |
|---|---|---|---|
| Ghost mannequin | Shirts, dresses, jackets, structured apparel | Shows shape without showing a person | Needs careful styling and editing |
| Flat lay | Knitwear, casual pieces, accessories, detail shots | Fast and simple to set up | Can hide fit and structure |
| On hanger | Quick resale listings and lightweight items | Easy to photograph in volume | May look less polished or distorted |
| Model shot | Fashion campaigns and fit-focused products | Shows movement and real-world styling | Requires more time and coordination |
For example, a soft oversized sweater may look inviting in a flat lay that emphasizes texture. A formal blazer, however, will usually benefit from a ghost mannequin image because buyers need to see the shoulder line and lapel shape. A model shot can then be added as an additional image if you want to show scale or styling inspiration.
Best Garments for Ghost Mannequin Images
Almost any apparel item can be photographed this way, but some categories produce especially strong results. Consider using a ghost mannequin for:
- Blazers, suit jackets, and coats
- Button-down shirts and blouses
- T-shirts, polo shirts, and sweatshirts
- Dresses, jumpsuits, and rompers
- Skirts and tailored trousers
- Activewear tops and matching sets
- Children’s clothing that benefits from a visible silhouette
Items that are extremely delicate, heavily draped, very oversized, or difficult to secure may require extra styling. In those cases, a combination of ghost mannequin, flat-lay, and close-up detail photos may give shoppers the most accurate view.
How to Prepare Clothing Before You Photograph It
The quality of a ghost mannequin image begins before you take the photo. Editing can improve presentation, but it cannot fully replace good preparation. Spend a few minutes making the garment look intentional and well cared for.
- Inspect the item: Check for lint, stains, missing buttons, loose threads, and visible damage.
- Smooth wrinkles: Steam or gently smooth the fabric so the garment looks clean and properly sized.
- Choose the right mannequin: Use a size and shape that supports the garment without stretching it unnaturally.
- Style the fit: Align seams, button closures, straighten hems, and arrange sleeves evenly.
- Secure loose areas: Clips, pins, or tape placed out of view can help create a clean silhouette.
- Capture detail images: Photograph labels, fabric texture, hardware, care tags, and flaws separately.
Small details matter. A crooked collar or wrinkled sleeve can make an otherwise high-quality item look less appealing. Taking time to style the garment also reduces the amount of editing required later.
Simple Lighting and Background Guidelines
You do not need a large studio to create useful e-commerce clothing photos. What matters most is even lighting, a clutter-free background, and consistent camera placement. Window light can work well when it is bright but indirect. If you use artificial lighting, aim for soft, balanced light on both sides of the garment to reduce harsh shadows.
A plain white, light gray, or neutral background makes clothing colors easier to evaluate and simplifies background removal. Keep the camera level with the garment and leave enough space around the item for consistent cropping. Photographing every product from a similar distance helps your listing grid feel more polished.
Consistency is often more important than expensive equipment. A repeatable setup helps every listing look intentional.
Editing Tips for a Natural Ghost Mannequin Effect
Editing is where the visible mannequin disappears and the garment becomes the clear subject. The goal is not to make the item look unrealistic. Instead, aim for an accurate, clean presentation that reflects the true color, fit, and condition of the garment.
A typical workflow includes background removal, removal of visible mannequin sections, and combining a front image with a separate image of the inside neckline or waistband. The final product should have smooth edges, believable shadows, and a natural interior view.
- Keep garment colors true to life rather than over-brightening them.
- Do not erase meaningful seams, folds, or texture.
- Use a clean background that meets marketplace image guidelines.
- Check edges around sleeves, straps, collars, and hems at full size.
- Make sure the interior insert matches the angle and lighting of the main image.
AI photo editing tools can reduce the time needed for repetitive tasks such as background removal, wrinkle cleanup, and mannequin removal. Still, review every image before publishing. Accurate photos help set realistic buyer expectations and may reduce avoidable questions or returns.
Build a Better Product Image Set
A ghost mannequin image is often best as the lead photo, but it should not be the only image in a listing. Buyers appreciate a complete view of an item before they purchase it. For most apparel listings, include a mix of front, back, detail, label, fabric, and condition photos.
A practical image sequence might look like this:
- Front ghost mannequin image on a clean background
- Back view showing the overall silhouette
- Interior neckline, waistband, or lining view
- Close-up of fabric texture, print, or hardware
- Brand, size, and care labels
- Clear photos of any wear, flaws, or alterations
This approach combines attractive presentation with transparency. The lead photo captures attention, while the supporting images help shoppers make an informed decision.
Common Ghost Mannequin Photography Mistakes
Even a strong concept can fall flat when the execution feels rushed. Avoid these common mistakes:
- Overediting: Removing every natural fold can make clothing appear artificial.
- Uneven lighting: Shadows that change between images can make the product look inconsistent.
- Poorly fitted mannequins: A garment stretched too tightly or hanging too loosely can misrepresent fit.
- Missing interior details: A visible empty neckline without an interior insert can look unfinished.
- Ignoring condition: Clean presentation should never hide damage or signs of wear.
The best ghost mannequin photos are polished but honest. They make the garment easy to evaluate while preserving the details that make it unique.
Make Ghost Mannequin Photography Part of Your Workflow
For resellers and brands, ghost mannequin photography can be a practical way to create a more professional catalog without arranging a model shoot for every item. Start by choosing one or two garment categories, building a repeatable setup, and using the same image order across your listings. As your process becomes faster, you can expand it to more inventory.
Tools such as Clothing Studio can help simplify parts of the workflow, including clothing cleanup and background editing, so you can spend more time listing and less time managing individual photo adjustments. The priority, however, should always be clear, consistent images that help shoppers understand exactly what they are buying.