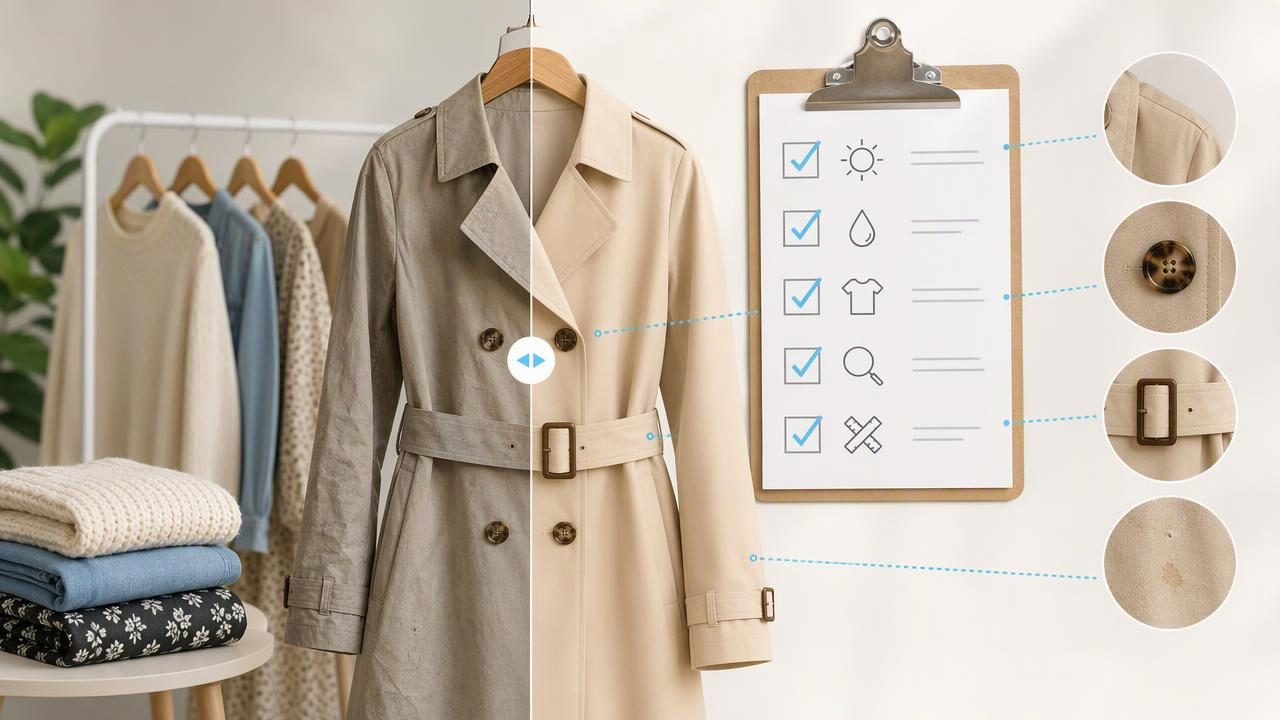
A good photo editor can make fashion resale listings look cleaner, more consistent, and easier to browse. It can also create problems when editing changes what a buyer reasonably expects to receive. For clothing sellers, the goal is not to make every garment look factory-new. The goal is to present the actual item clearly, reduce distracting photo issues, and help shoppers understand the garment’s shape, color, condition, and details.
This matters whether you sell one-off thrift finds, vintage pieces, boutique inventory, or your own brand’s returned stock. Buyers cannot touch the fabric, inspect the seams, or try on the garment before purchasing. Your photos carry much of that information. Thoughtful editing supports buyer confidence; excessive editing can create disappointment, returns, and avoidable questions.
This checklist explains what to improve, what to leave alone, and how to compare an edited apparel image with the original before publishing a listing.
What a Photo Editor Should Improve in Clothing Listings
Fashion resale images often begin in less-than-perfect conditions: a dim bedroom, a crowded stockroom, a hanger against a patterned wall, or a folded garment photographed near a window. Editing is useful when it removes presentation distractions without changing the item itself.
Appropriate adjustments typically include:
- Removing a busy or inconsistent background.
- Correcting exposure so dark fabric is still visible.
- Lightly adjusting white balance when indoor lighting makes a white shirt appear yellow or blue.
- Reducing minor visual wrinkles caused by laying out or hanging a garment for a quick photo.
- Cropping the image so the garment fills the frame without cutting off important details.
- Creating a consistent product-photo layout across a shop.
These changes help the buyer focus on the clothing. They do not alter the size, brand, material, construction, wear, or condition of the item. That distinction should guide every edit.
Start With a Strong Original Photo
The best editing decisions begin before you open a photo editor. AI tools and manual adjustments can improve presentation, but they cannot reliably recreate missing visual information. If the care label is unreadable, the zipper is hidden, or the fabric texture is blurred, take another photo rather than trying to repair it digitally.
Use soft, even light when possible. Place the garment on a clean surface, hang it straight, or use a mannequin according to the type of listing image you need. Smooth the garment by hand before shooting, but do not stretch it to imply a different fit. Capture both full-item images and close-ups of labels, fabric texture, closures, pockets, embroidery, and any flaws.
Useful rule: Edit the presentation, not the product’s truth.
Keep at least one original image until the listing is live and the order is complete. It gives you a reference point if you need to confirm the condition shown in your listing.
Choose the Right Clothing Presentation Before Editing
Different layouts communicate different information. A clean white background is not automatically better than every alternative. The best choice depends on the garment and the buyer’s likely questions.
| Presentation style | Best for | What to check before publishing |
|---|---|---|
| Flat lay | Tees, knitwear, casualwear, accessories | Ensure sleeves, hems, and proportions are not distorted by the layout. |
| On-hanger | Jackets, dresses, blouses, structured pieces | Keep the hanger and neckline straight; show the lower shape in another image if needed. |
| Folded | Denim, sweatshirts, inventory overview images | Include an unfolded image so buyers can see length, sleeves, and full design. |
| Ghost mannequin | Structured apparel where shape and interior neckline matter | Compare the edited result to the original garment for accurate seams, openings, and silhouette. |
A ghost mannequin image can make an item look more dimensional than a flat lay, especially for collared shirts, blazers, and dresses. However, it should not be treated as an exact fit simulation. The final image may communicate general structure, but it cannot guarantee how the garment will sit on every body type.
A Concrete Example: Editing a Pre-Owned Linen Blazer
Imagine you are listing a tan linen blazer with a slightly rumpled surface, a dark closet background, and a small amount of wear inside one cuff. Your first photo is well lit enough to show the color, but the background competes with the garment and the sleeves are not perfectly smooth.
A sensible editing approach would be to remove the distracting background, crop the blazer consistently, and make a restrained exposure adjustment so the tan fabric does not look gray. You could also reduce the most distracting folds around the lapels and front panels if those folds were created by storage or the photo setup.
What should remain? The natural texture of linen, the visible weave, the realistic drape, and the cuff wear. Linen normally has texture and some wrinkling. Removing every crease could make the buyer expect a smoother fabric than they will receive. Likewise, repairing the worn cuff in the main image would be misleading. Instead, include a clear close-up and mention the condition in the description.
In this example, editing makes the listing easier to evaluate while the close-up protects accuracy. The buyer sees an attractive product image, then has the information needed to make an informed decision.
Wrinkle Retouching: Improve Distractions, Preserve Fabric Character
Wrinkle reduction is one of the most useful apparel-photo improvements, but it needs judgment. Some wrinkles are temporary presentation issues. Others are part of the fabric, construction, or garment condition.
- Usually reasonable to reduce: sharp folds from being packed, a sleeve bent awkwardly on a hanger, or a crease caused by a rushed flat lay.
- Usually important to preserve: linen texture, intentional pleats, gathered fabric, ribbing, distressed details, puckering near damaged seams, and permanent wear lines.
Always compare the revised image with the original at normal viewing size and at a closer zoom. Ask whether the edit removed information that a careful buyer would want to see. A photo editor cannot determine whether a crease is temporary, whether a fabric is stretched, or whether puckering indicates a defect. That decision remains with the seller.
Use Background Removal Without Losing Important Edges
Background removal can make a resale storefront feel organized, especially when inventory comes from many sources. Yet clothing has challenging edges: sheer sleeves, fringe, lace, dark hems, fuzzy knits, straps, and loose threads. Inspect those areas carefully after removing the background.
Look for clipped edges, missing fabric, halos around dark garments, or sections that look unnaturally cut out. If an image has a complicated edge, use an additional original-style photo in the carousel. This gives buyers a more complete view and reduces the chance that a delicate detail disappears against a clean background.
Consistency helps too. If your shop uses a light background, choose a similar brightness and crop for most primary images. Buyers can scan inventory faster when the visual treatment is predictable. Still, consistency should never override clarity: a black velvet dress may need a different lighting approach than a white cotton blouse.
Do Not Edit Away Flaws, Measurements, or Color Differences
Condition disclosure is especially important in fashion reselling. Small flaws may be acceptable to a buyer, but hidden flaws are a common source of dissatisfaction. Avoid retouching stains, holes, fading, loose stitching, discoloration, pilling, cracking print, missing buttons, or worn elastic. Photograph them clearly and describe them in plain language.
Color deserves the same care. Adjusting a photo to correct a yellow indoor cast is helpful. Changing olive green into bright emerald, making faded black look jet black, or warming a beige item until it appears camel is not. If the color is difficult to capture, include a brief note such as “color may vary slightly by screen” while still making a good-faith effort to show it accurately.
Never rely on an edited silhouette to communicate measurements. Include written measurements for chest, waist, inseam, rise, length, and other relevant dimensions. A ghost mannequin, hanger, or model-style presentation can show shape, but it does not replace numbers.
Final Review Checklist Before You Publish
- Compare the edited image with the original photo.
- Confirm that the garment’s color still looks realistic.
- Check neckline, hems, straps, sleeves, and fabric edges for editing artifacts.
- Make sure intentional texture, pleats, and material details remain visible.
- Confirm that flaws have not been removed or obscured.
- Add separate detail photos for labels, tags, measurements, and condition issues.
- Review the listing on a phone screen, where many shoppers will first see it.
For sellers looking for an iOS photo editor focused on apparel presentation, Clothing Studio’s guide to removing clothing wrinkles offers additional context on making restrained wrinkle edits for clothing images. As with any editing workflow, review the output against the original garment photo and keep condition details visible.
Better Editing Builds Better Buyer Confidence
Professional-looking e-commerce photography does not require a flawless garment or an artificially perfect image. It requires accurate, useful presentation. Remove distractions, correct basic lighting, choose a suitable clothing layout, and use photo editing to make real details easier to see.
When your edited images match the item a buyer receives, your listings can look polished while remaining honest. That is the balance that supports clearer purchasing decisions, stronger trust, and a more dependable fashion resale shop.
